Monday 11 April 2016

The HivePi Camera!


Autopsy saws are very difficult to come by in Cairo. To buy one you need to be a certified dive instructor with at least 150 years experience in extracting raw minerals from mushrooms.

Today I'll be talking about my Hive Camera. 

Mashroo3 hive
Beeso Hive 1
Some background... My brother started to keep bees a couple of years ago. It's something he's wanted to do since he was a child. So at long last he got his silent partners to cough up some money for some hives, and start an apiary.

Bees are fascinating insects, they act together as a community for protection, survival, resource management, and general buzzing around annoying the odd middle aged person into dropping their drink, spilling said drink onto neighboring middle aged people, freaking out a few others in a cascade effect panicking a whole group of people (who under normal circumstances would be enjoying a sunny Sunday afternoon) from under a canopy into a pond, or in the worst case scenario; sting an unsuspecting bystander and consequently dying shortly afterwards. We also (kind of) steal their food supply and call it honey.

A very large swarm of bees that has settled
Generally bees act as a group, unless they are outside a hive, or have some disease. The male bees (the drones-- Haploid genomes) fertilize the Queen bee (Diploid genome) which consequently lays fertilized eggs for female worker bees (Also Diploid genomes). Any unfertilized eggs develop into Haploid drones (if they are allowed to by the worker bees--- in the winter, when resources are low they are murdered by the womenfolk! -- As are diploid drones). Generally the Queen never leaves the hive except to have sex, which she does with multiple partners. A swarm of workers protects her guided by her scent, and sometimes a new colony is formed when he highness decides she's not going back to mum's place.

Newly occupied frame

Anyway, to cut a long story short, this year, we replenished our hives (bought new colonies). Sometimes they don't like where they live so they decide to go apartment hunting. One such colony decided to find an empty box (used for demonstration) to settle in. I was just mucking about in our garden and lo and behold there were bees in there.


Not being at all interested in bees, I thought it would be really cool to spy on them. And so, with a raspberry pi in hand, I set forth to disturb their nest of femininity and intrude the harem......


After testing the raspicam I bought, I decided it needed to be focused a little better. After all what good was checking on the ladies if the image was going to be fuzzy? There are apparently 2 ways to do this. One being to twist the lens on the raspicam to adjust the focus, and the other way is to stick a lens on top of the raspicam making it's effective focal point closer.

Raspicam with a 4+ diopter lens on a mount
Being the electronics destructor that I am, I opted for option 2. I had previously purchased a set of 52mm lenses for a cannon DSLR lens that allow you to come disturbingly close to your subject. It's great if you want to make people feel a little awkward. And it makes for good photography! People's grimaces are a spectacular way to capture human emotion... The images however aren't as appealing to everyone.

ANYHOW... I've tried 4+ diopter and the "macro" lens, and both work well for different distances. I found that the macro one, allows for a real closeup to the hive frame.

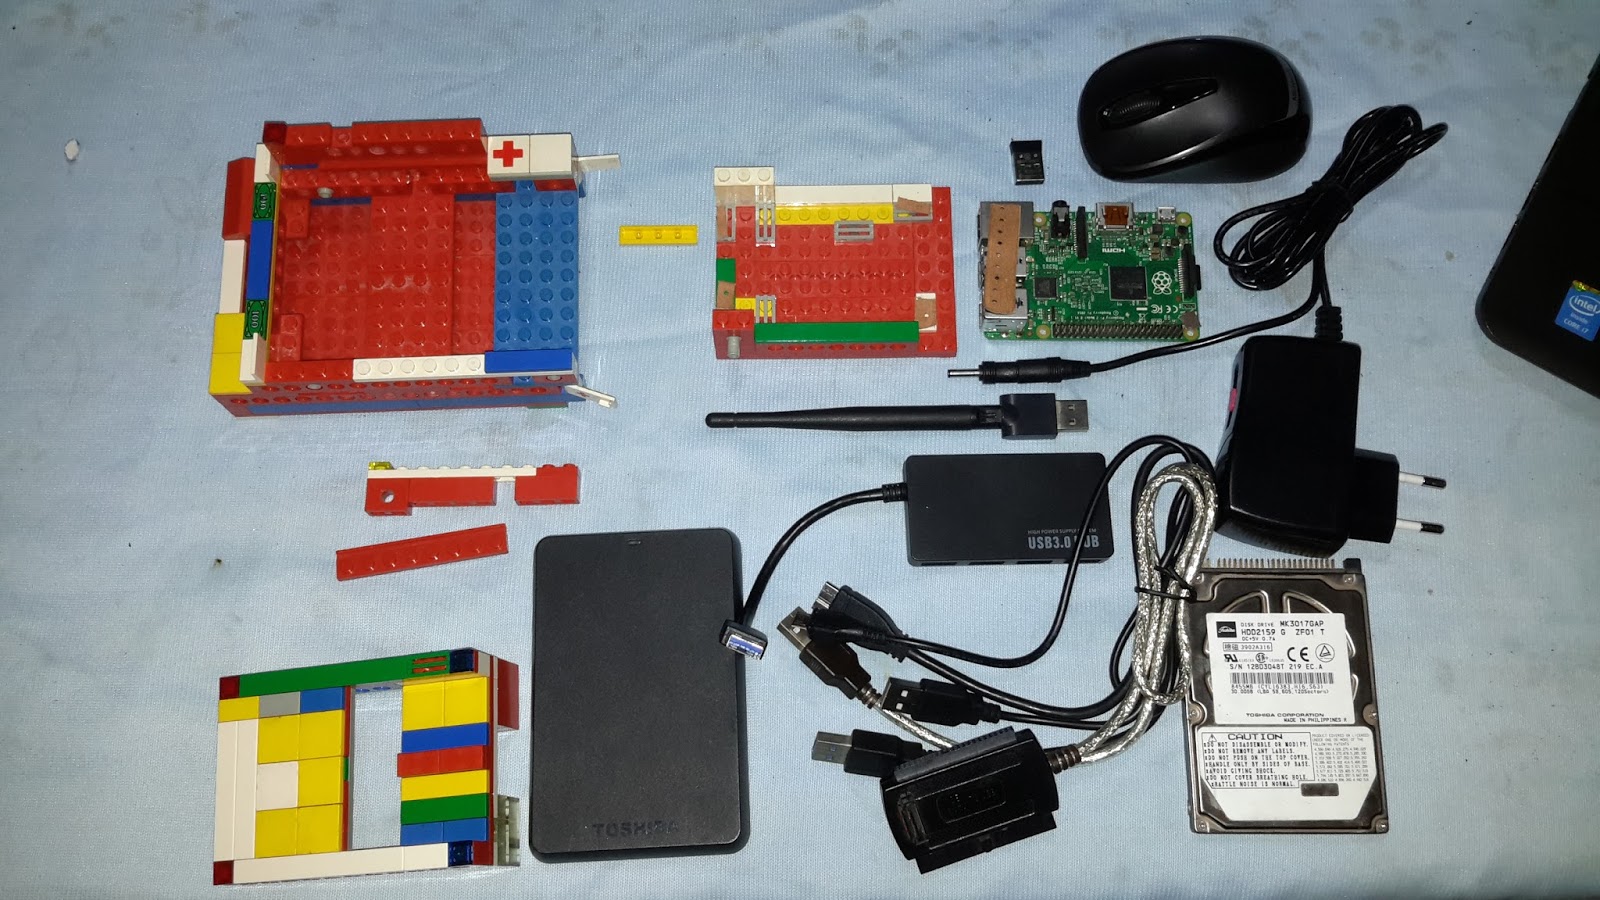
The Kit... with connectors

So here is a list of the essentials so far: 

- a Raspberry pi 2 ( an A+ would have sufficed, but can you believe I can't find one!)
- A 5mp Raspicam
- An extra long raspicam cable (the longer the better)
- Wi-fi dongle
- Long USB power cable
- 10000mAh power block.
- A suitable hive
- A suitable light source
------------------------------------------I also added
- An electronic Hygrometer/thermometer (grove) from FutureElectronics
- A laptop
- Protective gear (for the hive)
- A tripod

So I may have fumbled on the light source... I had to choose something that isn't too bright, or something that will get too hot... so I made a custom LED fixture. However... it's not very bright, to the point where I can't really see anything. I tried putting my phone inside the hive in the hope that the flash light would show something when I covered the lid, but it was pointed to the wrong direction. So the solution I guess is more LEDs with a reflector, which presents a size problem, but we'll cross that bridge when we come to it.

The LEDs on both sides

The Wiring

Sunday 10 April 2016

A LONG long time ago !

SO, it's been a while since I blogged last. For reasons I might go into, I've been a little busy, learning about the Raspberry Pi, and building different things with it. My latest is a Hive camera, which I have a video for now (But won't post until tomorrow).

I've also successfully built a couple of rovers that can be controlled over a wi-fi connection. I've also tried to control them over the popular (and cheapish --in Cairo) nrf24L01+ radio transceiver, with little luck (But only because I'm very impatient as you might expect).

Also there is the programming, quite a steep curve.

So anyhow, here are some pictures of the inventions/copies.

This is the KodiBot. Basically the Legopi running Kodi. I had to make it a little more friendly for my Nephew.

Sunday 11 October 2015

The Lego pi


When I bought my Raspberry Pi I was fortunate to not have a case for it. Allowing my creativity to flow (not really) and to build my own. I saw a post, and I thought why not? this then evolved into what it is now...

Although this isn't a how to, I just want to show off my set-up. I must say, my brother also contributed to this...
The Lego Bowl


Le Box...


The Naked Pi


(Some of) The wires


The Box was good enough to use ... but with all the wiring I needed something more sturdy to handle the Raspberry ... and with the Lego so easily accessible ...

Now just to make things clear I tried several things, I'll only show what I already have. Early on I decided to use a USB hub to power/co-power the RPI2. I couldn't really find a decent hub... I didn't really try that hard to be honest. Powered hubs aren't all that available in Cairo for some reason. So I didn't buy one. The regular hub I bought had a power socket, all that was missing was the power adaptor (which I got from Radioshack). I knew I would have to incorporate the hub into my design.

Here are all the parts I wanted (Together with the partially built lego casing).


The List:
- Raspberry pi2
- Ralink Wireless Dongol
- USB 3 Hub
- 5 Volt 2 Amp power source
- 1TB Toshiba HD
- 30GB Sata Hard drive (Toshiba)
- Lego
- USB Wireless Mouse
- USB keyboard (Not shown)
- USB Sata converter
- custom cut pieces of leather (padding for the chipboard)
- an HDMI cable to hookup to your TV

You might wonder why I have two hard drives... the (very old)30GB Sata was intended to be used as the main OS bin for use with berryboot (see my earlier post). The second 1TB drive as my NAS extension. As it happens, my Sata drive was corrupt (or perhaps became corrupt) while I was mucking about with berryboot, so now I have a different drive acting as my OS bin.

Ok ... so the way I set it up was:
- Housing for the Pi
- Housing for the hard drives
- Housing for the Hub.

I fudged my first hub (utterly destroyed it) which had nice switches and LEDs all over it, so my second hub was a much better fit for the current design (of course). A picture at the end shows the original hub.


The Housing for the Pi (The Pi Block)


I sat the chipset ontop of a base of flat lego using tiles to stabilize the underside of the chip. The pointy bits make it difficult to keep it in place, so I use a strip of leather under the GPIO pins, together with the tiles from the lego racecars.... ?? (Grill tiles apparently)

I also used the round single column type bricks (grey in the picture here) to keep the pi from moving about. I had to use the little bits of leather you see in the lower picture to keep them in place. there is about a 2mm gap between the chip and the block otherwise.

The top part here sits ontop of the Pi with the "clear" blocks by the pi's LEDs so you can see them. I used Technic blocks in the hope that the  holes would provide enough airflow to keep the chip cool. I could add a fan to the contraption, but maybe I’ll wait for the heat-sinks.


You can see here I have opted for the open top option ... the tiles on top can be removed to reveal more holes in the ceiling (for a future fan?). 

An open design to allow for access to the GPIO.

I also used a thin piece of leather on top of the USB slots to stabilize the board in place. (Above and below the board) 


An extra step up design for addition of a fan ? (later on maybe)


Housing for the Hard Drives:


My brother kindly made this custom made housing for the two drives. the SATA sits on top, while the larger of the two at the bottom. Nothing special here except for the gates... 


(What will become) The NAS Drive goes below.


The (dead) SATA drive....

(The only difference now is that the drive in place is a WD drive)


The USB Hub Housing: 

This was the easy part. Just stacked the Pi Block on top of the Hard Drive Housing, with the USB hub Sandwiched in the middle. (Had to wedge it with a tile on the side)


As you can see the Hub is just sitting on top of the sata drive and the relatively short USB cable is poking out. The yellow tile on the top right is just there to wedge the hub in place.


Just stacked the Pi-Block on top of the hub, making sure to keep the USB cable close to the slots on the Pi chip-set.


This shows the USB hub connected to the Pi, and the hub being powered by a variable voltage power supply (which I have to be very careful with... ).

This is how I power the Pi itself. Instead of using two power supplies, I just hookup the Hub to my electric socket, and power the Pi through the hub. I also connect the hub USB to the Pi. I'm not sure how dangerous this may be, but my last hub didn't mind this happening. There are tutorials out there suggesting that you could cut off the power to the pi through the hub by snipping the ground and 5V lines from the USB plug to and from the hub. I did that with my previous hub and it didn't work out for the hub... maybe it was just the Hub... But given the abundance of hubs in Cairo... I'm sticking to my current setup.

No all I did was hookup the USB wires to the appropriate devices. I plugged the Ralink Wifi Dongle to the Hub as well as the two drives. anything else that is low power can go into the hub directly.


All hooked up!

Here there are three additions, A wireless gamepad, a 3.5mm Audio Video jack, and a power block. The game pad is one I bought from Carrefour for about 90 LE. The Cable is for regular TVs without an HDMI output. And the power block is for powering the Pi or can be used as a battery backup (although this doesn't really work at the moment for me, as it doesn't provide enough juice for the pi and the hub together).

And that is about it really...

Here are a couple of other pics of the old and new setup.


The LEDs Lit up when you flicked the switch. This design covered the GPIO pins and wasn't very stable, also I upped the voltage after clipping the 5v and ground wires on the usb hub board which killed the hub.
Hooked up to the TV

Found a box for beach mode...

Saturday 10 October 2015

The Raspberry Pi Extraordinaire !

So... to begin, 

I bought a Raspberry pi 2.

I've been hearing about it here and there and decided it was time that I tried out something new as a hobby/pastime. Having ample time on my hands, I decided to buy this wonderful little contraption. For the past two weeks I've been happily tinkering away and playing around with getting it set-up and working. Being very pleased with my handiwork I've decided to share it with the world. For those of you unaware the Raspberry Pi is a "credit card sized single board computer" developed in the UK. And being an old Sinclair fan (and owner), I decided this must be a good thing to try. Although it was primarily developed to be a learning aid for computers and programming etc (as you can see here), it seems like it's being used for many interesting projects like a media centre, drone( s ), retrogames console, web-servers, etc, etc, etc.

Having no particular ideas in mind I decided to try several.

I now have a set-up of Kodi( x-box media center), Retropie (games console), desktop (Raspian, and Ubuntu Mate 15.04).
I've also been mucking about with berryboot, which is a cool way to boot several operating systems on your Raspberry (from USB... if you so choose to).

Still going to try using it as a wireless access point, (Wireless was annoying to fix on berryboot, one of my dongols still doesn't work! Have to try compiling the berryboot kernel for that to work... not done that before). I would also like to do this, but being in Cairo I'm not sure I can get all the components (or if I’m allowed to)...