When I bought my Raspberry Pi I was fortunate to not have a case for it. Allowing my creativity to flow (not really) and to build my own. I saw a post, and I thought why not? this then evolved into what it is now...
Although this isn't a how to, I just want to show off my set-up. I must say, my brother also contributed to this...
 |
| The Lego Bowl |
 |
| Le Box... |
 |
| The Naked Pi |
 |
| (Some of) The wires |
The Box was good enough to use ... but with all the wiring I needed something more sturdy to handle the Raspberry ... and with the Lego so easily accessible ...
Now just to make things clear I tried several things, I'll only show what I already have. Early on I decided to use a USB hub to power/co-power the RPI2. I couldn't really find a decent hub... I didn't really try that hard to be honest. Powered hubs aren't all that available in Cairo for some reason. So I didn't buy one. The regular hub I bought had a power socket, all that was missing was the power adaptor (which I got from Radioshack). I knew I would have to incorporate the hub into my design.
Here are all the parts I wanted (Together with the partially built lego casing).
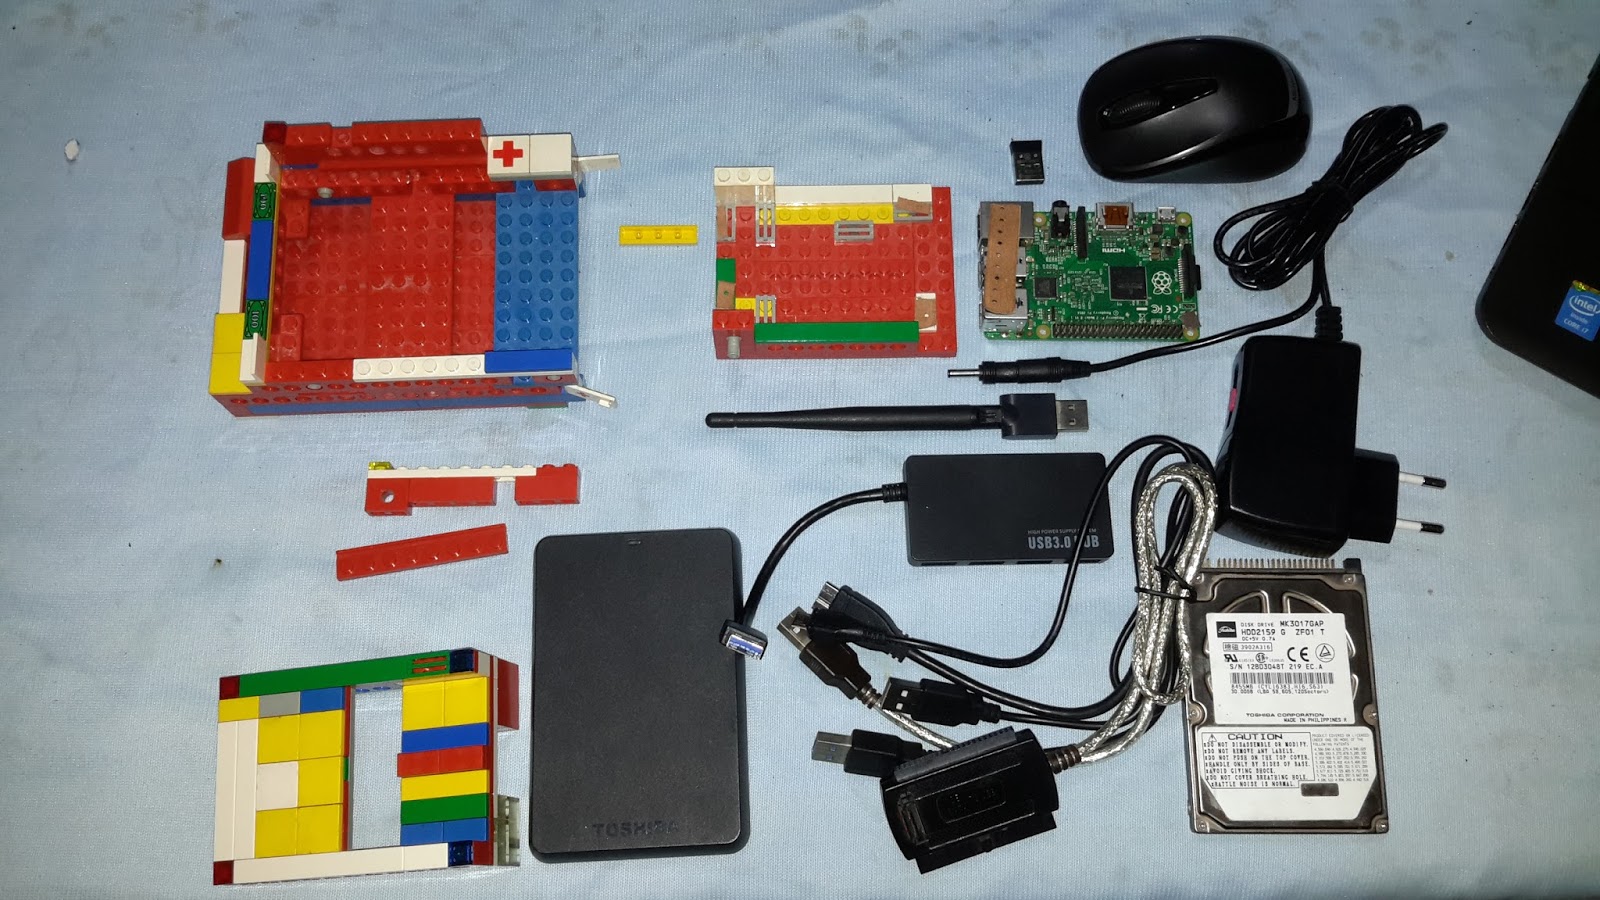
The List:
- Raspberry pi2
- Ralink Wireless Dongol
- USB 3 Hub
- 5 Volt 2 Amp power source
- 1TB Toshiba HD
- 30GB Sata Hard drive (Toshiba)
- Lego
- USB Wireless Mouse
- USB keyboard (Not shown)
- USB Sata converter
- custom cut pieces of leather (padding for the chipboard)
- an HDMI cable to hookup to your TV
You might wonder why I have two hard drives... the (very old)30GB Sata was intended to be used as the main OS bin for use with berryboot (see my earlier post). The second 1TB drive as my NAS extension. As it happens, my Sata drive was corrupt (or perhaps became corrupt) while I was mucking about with berryboot, so now I have a different drive acting as my OS bin.
Ok ... so the way I set it up was:
- Housing for the Pi
- Housing for the hard drives
- Housing for the Hub.
I fudged my first hub (utterly destroyed it) which had nice switches and LEDs all over it, so my second hub was a much better fit for the current design (of course). A picture at the end shows the original hub.
The Housing for the Pi (The Pi Block)

I also used the round single column type bricks (grey in the picture here) to keep the pi from moving about. I had to use the little bits of leather you see in the lower picture to keep them in place. there is about a 2mm gap between the chip and the block otherwise.
The top part here sits ontop of the Pi with the "clear" blocks by the pi's LEDs so you can see them. I used Technic blocks in the hope that the holes would provide enough airflow to keep the chip cool. I could add a fan to the contraption, but maybe I’ll wait for the heat-sinks.

You can see here I have opted for the open top option ... the tiles on top can be removed to reveal more holes in the ceiling (for a future fan?).

An open design to allow for access to the GPIO.
I also used a thin piece of leather on top of the USB slots to stabilize the board in place. (Above and below the board)

An extra step up design for addition of a fan ? (later on maybe)
Housing for the Hard Drives:

My brother kindly made this custom made housing for the two drives. the SATA sits on top, while the larger of the two at the bottom. Nothing special here except for the gates...


(What will become) The NAS Drive goes below.
The (dead) SATA drive....
(The only difference now is that the drive in place is a WD drive)
The USB Hub Housing:
This was the easy part. Just stacked the Pi Block on top of the Hard Drive Housing, with the USB hub Sandwiched in the middle. (Had to wedge it with a tile on the side)

As you can see the Hub is just sitting on top of the sata drive and the relatively short USB cable is poking out. The yellow tile on the top right is just there to wedge the hub in place.

Just stacked the Pi-Block on top of the hub, making sure to keep the USB cable close to the slots on the Pi chip-set.

This shows the USB hub connected to the Pi, and the hub being powered by a variable voltage power supply (which I have to be very careful with... ).

This is how I power the Pi itself. Instead of using two power supplies, I just hookup the Hub to my electric socket, and power the Pi through the hub. I also connect the hub USB to the Pi. I'm not sure how dangerous this may be, but my last hub didn't mind this happening. There are tutorials out there suggesting that you could cut off the power to the pi through the hub by snipping the ground and 5V lines from the USB plug to and from the hub. I did that with my previous hub and it didn't work out for the hub... maybe it was just the Hub... But given the abundance of hubs in Cairo... I'm sticking to my current setup.
No all I did was hookup the USB wires to the appropriate devices. I plugged the Ralink Wifi Dongle to the Hub as well as the two drives. anything else that is low power can go into the hub directly.

All hooked up!
Here there are three additions, A wireless gamepad, a 3.5mm Audio Video jack, and a power block. The game pad is one I bought from Carrefour for about 90 LE. The Cable is for regular TVs without an HDMI output. And the power block is for powering the Pi or can be used as a battery backup (although this doesn't really work at the moment for me, as it doesn't provide enough juice for the pi and the hub together).
And that is about it really...
Here are a couple of other pics of the old and new setup.
 |
| The LEDs Lit up when you flicked the switch. This design covered the GPIO pins and wasn't very stable, also I upped the voltage after clipping the 5v and ground wires on the usb hub board which killed the hub. |
 |
| Hooked up to the TV |
 |
| Found a box for beach mode... |
No comments:
Post a Comment